After managing computers for many years, I’ve come to appreciate several free tools that make my job easier. In this article, I’ll share two of my favorite free visual disk space analyzer tools that help me keep hard drive space under control. They’re simple and a must-have for anyone looking to keep their storage organized.

The Benefits of Using Visual Disk Space Analyzers
Using visual tools to analyze disk space can make a big difference, especially for people who, like me, understand information better when it’s presented visually. Traditional file explorers show files in lists or folders, which can make it difficult to see the big picture.
With visual disk space analyzers, you get a clear, graphical view of what’s taking up space on your drive. This can save time and make decision-making easier because you can quickly spot which files or folders are using the most storage.
Visual tools also allow you to organize your files more efficiently. When you can see, in one glance, which files are large or unnecessary, it’s much simpler to decide what to keep and what to delete
For anyone who wants a faster, easier way to manage their storage, these visual tools are a great option.

SpaceSniffer for PC
SpaceSniffer is my go-to tool for managing disk space on a PC. It’s a free program that doesn’t even need to be installed, so it’s easy to run on different computers.
SpaceSniffer analyzes your drive and displays your files and folders in a unique “treemap” layout. In this layout, files and folders appear as blocks of different sizes—bigger blocks mean larger files or folders, while smaller blocks take up less space.
This visual approach makes it simple to see which files are taking up the most room on your drive.
How SpaceSniffer Works
To use SpaceSniffer, you just need to download and open the program, select the drive you want to scan, and let it run. The scan might take a few minutes, depending on the amount of data you have, but once it’s done, you’ll see a full map of your drive’s contents.
You can double-click on any block (folder or file) to dive deeper, seeing what’s inside each folder. This helps you locate large or unused files quickly and easily.
Cleaning Up Disk Space with SpaceSniffer
SpaceSniffer also makes it straightforward to clean up your disk. Once you spot a file or folder that’s taking up too much space, you can right-click on it to navigate to its location on your computer.
From there, you can delete files directly. Just be careful to double-check what you’re deleting to avoid losing any important data!
Disk Inventory X for Mac
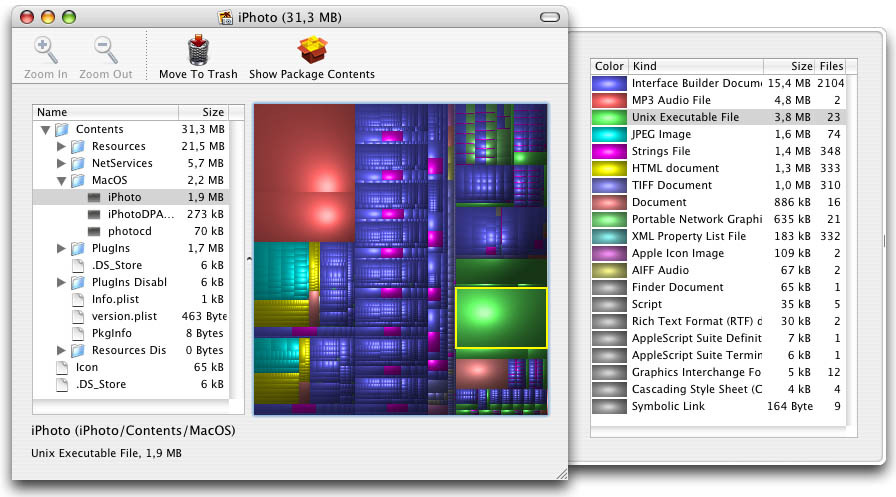
For Mac users, Disk Inventory X is a powerful and free tool that provides a similar visual experience for managing disk space. Like SpaceSniffer, Disk Inventory X shows a graphical display of your files and folders, making it easy to see what’s using up your storage.
The interface is colorful, with each type of file represented by different colors and block sizes. This clear view allows you to spot large files or folders quickly, helping you decide which ones you might want to delete or organize differently.
How Disk Inventory X Works
To start using Disk Inventory X, simply download the DMG file, open it, and drag the app into your Applications folder.
After launching it, select the drive you want to analyze, and Disk Inventory X will scan it. This may take a few minutes, depending on your drive’s size and contents.
Once the scan is complete, you’ll see a colorful map of your files, with larger blocks showing bigger files or folders and smaller blocks representing smaller items. Disk Inventory X also groups file types, making it even easier to identify space-hogging files at a glance.
Cleaning Up Disk Space with Disk Inventory X
When you find a file or folder that’s taking up too much space, Disk Inventory X makes it easy to take action. You can right-click on any block to locate it in Finder, where you can then delete it or move it if needed.
This tool helps you manage storage more effectively by giving you a clear, organized view of your drive’s contents. Just like with SpaceSniffer, be cautious when deleting files—make sure they’re unnecessary before removing them to avoid accidentally deleting something important.
Additional Tips for Using Disk Space Analyzers
Using disk space analyzers like SpaceSniffer and Disk Inventory X is a great start to managing your storage effectively, but a few extra tips can help you make the most of these tools.
Run Scans Regularly
Disk usage changes over time as we download files, install apps, and create new documents. Running regular scans—perhaps once a month—can help you stay on top of your storage.
This habit allows you to catch large or unnecessary files before they pile up and slow down your device.
Focus on Large Folders First
Both SpaceSniffer and Disk Inventory X make it easy to see which folders take up the most space. Start by exploring these larger folders, as they are more likely to contain files that can be deleted or moved to external storage.
For example, media files, old backups, and large application files are often stored in specific folders that you can clean up regularly.
Verify Before Deleting
Before deleting any files, take a moment to double-check that they aren’t important. SpaceSniffer and Disk Inventory X allow you to open files or navigate to them in their original folders, so you can make sure the file isn’t something you’ll need later.
It’s also a good idea to back up any files you’re unsure about before deleting them.
Empty Your Trash or Recycle Bin
After you delete files, remember to empty the Trash (on Mac) or Recycle Bin (on PC) to actually free up the space. Until this is done, the files are still taking up storage on your device.
Consider Moving Files to External Storage
If you have large files that you don’t want to delete but don’t need regularly, consider moving them to an external hard drive or cloud storage. This can free up space on your device while keeping those files accessible when you need them.
Let us know in the comments what you think.